> For the complete documentation index, see [llms.txt](https://docs.colonylab.io/llms.txt). Markdown versions of documentation pages are available by appending `.md` to page URLs; this page is available as [Markdown](https://docs.colonylab.io/early-stage-program/step-by-step-tutorials/kyc-process.md).
# KYC process
The following process pertains to **KYC**, although it's worth noting that you can also complete **KYB** on Colony's application.
{% hint style="warning" %}
*If you participated in Colony’s private sale and underwent KYC with Synaps, or if you KYCed through Quadrata in recent months, your KYC is already approved in our application — no need to go through the Synaps process mentioned below.*
{% endhint %}
## **How to complete your KYC verification: (updated October 30,2024)**
1- You need to be a $CLY staker to be able to KYC. Make sure you connect with the wallet you’re staking $CLY with on Colony’s application ([app.colonylab.io](https://app.colonylab.io/stake)) to proceed with the KYC process. This specific wallet you’re staking with is the one you will be using to participate in Seed/Private sales, through the Early-stage feature.
2- To access the KYC verification modal, click on your “**Profile**” at the top right corner of Colony’s application and select “**KYC verification**” to initiate the process.
3- To complete your KYC verification, you’ll need to verify your identity with our trusted KYC provider, Synaps, and register it within our application. Click “**Access KYC**” (or “Access KYB” if registering as a company) to begin, and the Synaps modal view within our app will guide you through each required step.
4- Our KYC process with **Synaps** is designed to be straightforward, involving 5 simple steps:
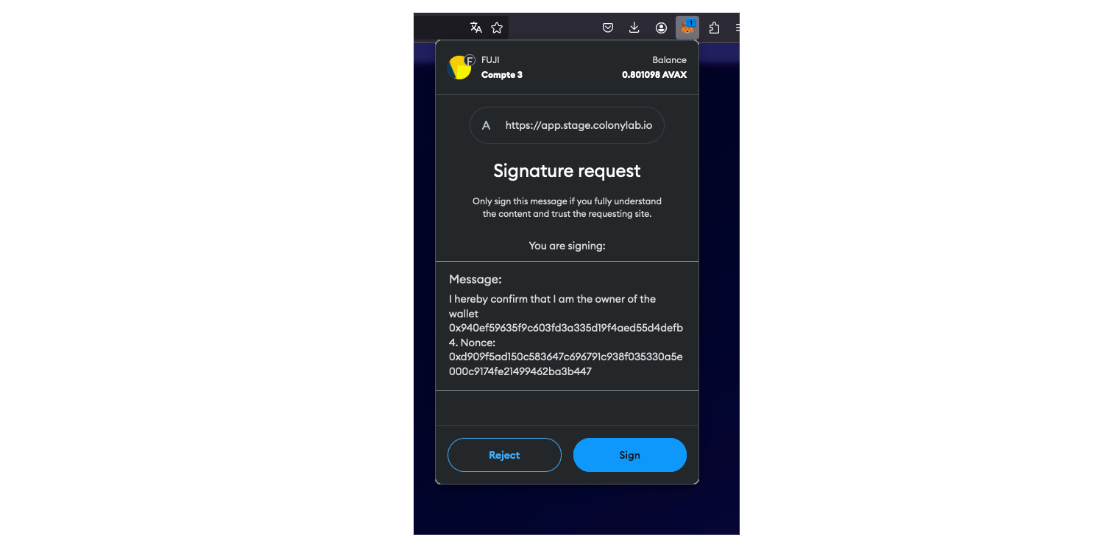
### Step 1: Access KYC
Click on “ACCESS KYC” to begin the identity verification process. You will have to sign a message to link your wallet to the KYC process. Then confirm your wallet ownership by clicking “Sign”.
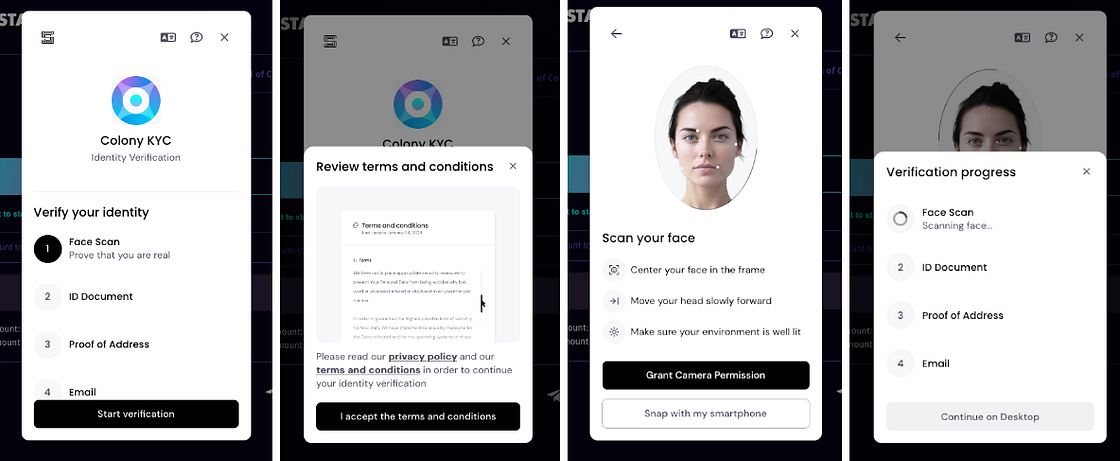
### Step 2: Identity Verification
1. Begin by selecting **Start Verification** and reviewing the **Terms and Conditions**. Accept to proceed.
2. Complete the **Face Scan\*** by centering your face in the frame, ensuring good lighting, and granting camera permission.
\*Note: This step can be done on your computer or mobile device by clicking “Snap with my smartphone” and scanning the QR code.
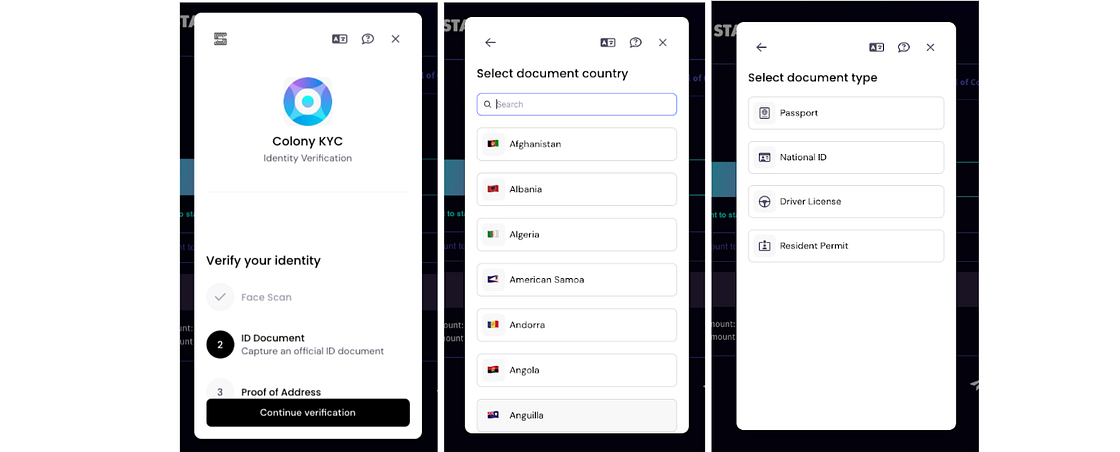
### **Step 3: ID Document Verification**
1. After completing the **Face Scan**, proceed to **ID Document Verification**. Click **Continue verification**.
2. Select your **document country** from the list provided.
3. Choose your **document type** (e.g., Passport, National ID, Driver License, or Resident Permit). Then scan your document\*.
\*Note: This step can be done on your computer or mobile device by clicking “Snap with my smartphone” and scanning the QR code.
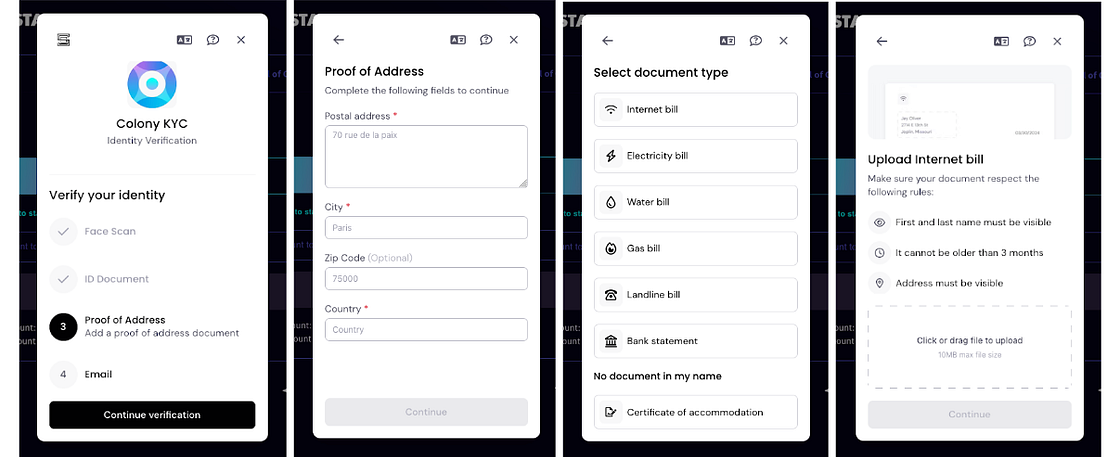
### **Step 4: Proof of Address Verification**
1. After completing the **ID Document Verification**, proceed to **Proof of Address Verification**. Click **Continue verification.**
2. Enter your address details (postal address, city, zip code, and country).
3. Select the type of address document to upload (e.g., Internet bill, electricity bill, bank statement).
4. Upload the document, ensuring your name, address, and a date within the last three months are visible.
⚠️ Note: If you're living at someone else's place:
If you are being hosted by another person, you will need to complete the following steps:
* Verify your host's ID document.
* Provide proof of your host's address.
* Upload a Certificate of Accommodation.
You can find the dedicated section for these requirements in the Synaps modal view under the document options.

A template for the Certificate of Accommodation can be downloaded directly from the submission screen.
Once the documents are uploaded, you will be redirected to the initial flow to continue the KYC process.
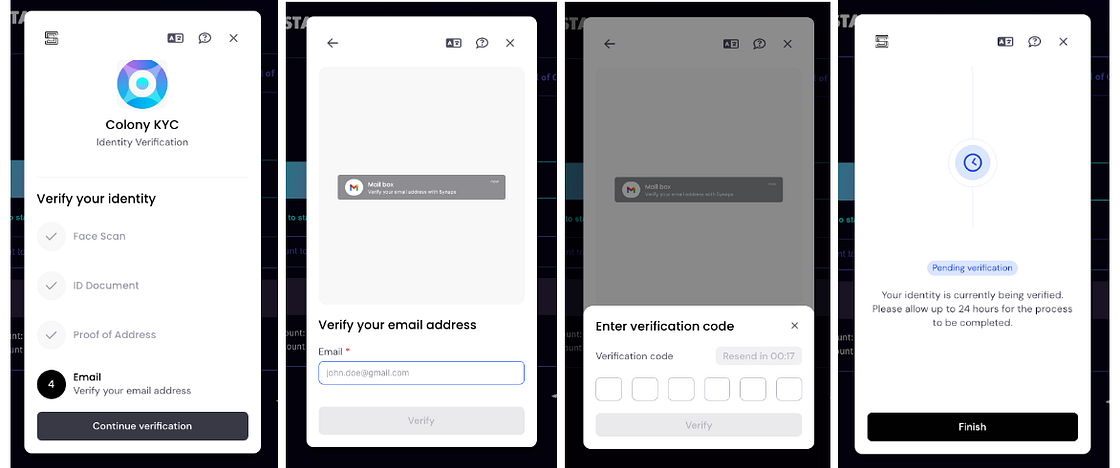
### **Step 5: Email Verification**
1. After **Proof of Address Verification**, proceed to **Email Verification**. Click **Continue verification**.
2. Enter your email address and click the Verify button.
3. You will receive an email with a code. Paste this code into the provided field and click Verify.
You now have completed the KYC process, and your submission will be reviewed shortly.
**❗️ Please check your KYC status regularly, as Synaps may request document resubmission if needed. All information regarding your KYC verification can be found by reopening the Synaps modal view on our application (as described in Step 1).**
### Step 6: Register your KYC on the Colony Lab’s application to enable access to the Early-stage feature.
This registration request is automatically triggered only if the user's passport aligns with Colony Lab’s KYC requirements. The user must then perform the transaction to fully complete the KYC process.
***
**✅ Once KYC is approved by Synaps and you register it on our application, congratulations — you’re all set! You’re now ready to participate in Colony’s Seed and Private sales of early-stage projects.**
***
## **Why KYC is mandatory but also Integral to Colony Lab?**
Take a moment to review the article below.
{% embed url="" %}
---
# Agent Instructions
This documentation is published with GitBook. GitBook is the documentation platform designed so that both humans and AI agents can read, navigate, and reason over technical content effectively. Learn more at gitbook.com.
## Querying This Documentation
If you need additional information that is not directly available in this page, you can query the documentation dynamically by asking a question.
Perform an HTTP GET request on the current page URL with the `ask` query parameter:
```
GET https://docs.colonylab.io/early-stage-program/step-by-step-tutorials/kyc-process.md?ask=
```
The question should be specific, self-contained, and written in natural language.
The response will contain a direct answer to the question and relevant excerpts and sources from the documentation.
Use this mechanism when the answer is not explicitly present in the current page, you need clarification or additional context, or you want to retrieve related documentation sections.